Tuesday 7 December 2021

Diorama card using In the forest


Hello and welcome!

Today I am sharing how I created a Diorama card using In the forest by Craft Consortium.

This beautiful paper collection was illustrated by Clare Therese and takes us to visit a beautiful forest full of flora and forna and wildlife including bears, raccoons and bunnies. 

I have created a card using the scene stripe in the 12 x 12 paper pad, I have also chosen to use Craft Consortium, Always & Forever glitter card in the shade Lilac. The products will be linked at the end should you wish to pick them up.


I have also created a video tutorial for how to put this card together which you can find here:

https://youtu.be/YjuybqK91d4


Key for measurements:

F - Front

M - Middle

B - Back

To create this card you will need:

F -

 One piece of cardstock 4 1/8 × 9 1/2" 

Score at 2" from each end 

Glitter cardstock - 

Two pieces 1 7/8 × 4" 

One piece 5 1/4 × 4"

Pattern Paper  - 

Two pieces  1 3/4 × 3 7/8"

One piece 5 1/8 × 3 7/8"

M - 

One piece of cardstock 4 1/8 × 7.5"

Score at 1" from each end

Glitter card 5 3/8 × 4"

Pattern Paper 5 1/4 × 3 7/8"

B -

One piece of cardstock 4 1/4 × 9 1/2"

Score at 2" from each end

Glitter card 5 3/8 × 4 1/8"

Pattern Paper 5 1/4 × 4"

Rear of card - 

One piece of glitter card 5 1/4 × 4 1/8"

White card 5 1/8 × 4"


I hope you enjoy this card, please tah me on social media if you give it a go as I love to see what everyone has done. All my Socials are linked below xox

https://www.instagram.com/cardsbykatefletcher

https://youtube.com/channel/UCqZLivtQUb1cG2ahYnhHlLQ

https://www.facebook.com/Cards-by-Kate-111227389688501/

http://cardsbykatefletcher.blogspot.com/?m=1

https://vm.tiktok.com/ZM8A5nryy/

My email:

Cardsbykatefletcher@gmail.com 

Tuesday 30 November 2021

Christmas crafting with Polkadoodles


Season's greetings friends!


This month http://paperfundaychallenges.blogspot.com/?m=1 have teamed up with  https://doubletroublechallenge.blogspot.com 


With only a few weeks till Christmas its time to post out the last few cards, tweak the bows on the gifts under the tree and relax in front of a Christmas movie in the evening. This truly is the best time of the year!

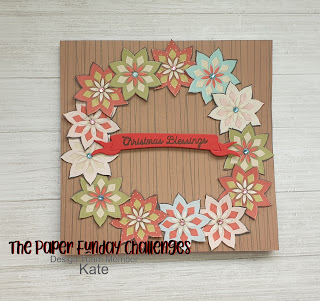
This month Paper Fundays Challenge is kindly sponsored by Polkadoodles, our theme is Christmas and I got to create this beautiful card using https://www.polkadoodles.co.uk/foliage-over-40-winnie-white-christmas-printable-digi-downloads/

I kept this card nice and simple, I used some woodgrain paper from my stash to represent the door and then created the wreath but slightly layering the flowers on top of each other. I added a gem in the center of each flower and finished the card by stamping onto a banner which I die cut from red card stock.


I absolutely love this card and think it turned out beautifully.

Thank you for following along with my crafty journey this year, I can't wait to see what the New Year has on store!!!

Wishing you a very Happy and peaceful Christmas.

Kate

Xoxo

Tuesday 9 November 2021

Pop out card using Paper Society #24


Hello Crafty friends,


Today I am sharing a belated video creating with Papercraft Society box #24 by Sam Calcott of Made to Suprise.

I made this beautiful pop out card and below are the measurements of card stock if you would like to follow along. 

Card Base:

6 × 12" score at 2,4,6 & 8"

You will need four pieces of pattern paper measuring 1 3/4 × 5 3/4"

You will need one piece of pattern paper measuring 3 3/4 × 5 3/4"

A plain piece of cardstock for your message measuring 3 5/8 × 5 5/8"

For the Pop out piece you will need one piece of cardstock the same colour as your base measuring 7 × 2 3/4" score at 3 1/2"

Lastly you need two peices of pattern paper cut to 3 3/8 × 2 1/2"

You will also require ephemera of your choice to decorate. 

The full video of this card being put together is here https://youtu.be/ZO9jV8A68Uo


My Unboxing video can also be seen using this link https://youtu.be/OYn5NSNdJH0

I hope you enjoy this card as much as I have!

My Socials:

https://www.instagram.com/cardsbykatefletcher

https://youtube.com/channel/UCqZLivtQUb1cG2ahYnhHlLQ

https://www.facebook.com/Cards-by-Kate-111227389688501/

http://cardsbykatefletcher.blogspot.com/?m=1

https://vm.tiktok.com/ZM8A5nryy/

My email:

Cardsbykatefletcher@gmail.com 


Wednesday 3 November 2021

PaperFundays November inspiration

 Wow! 

How are we in November all ready?!

November in England means fireworks for GuyFawkes night and in recent years Black Friday deals signal the start of the lead up to Christmas!

In the Us it will soon be thanks giving and a time for being grateful and giving thanks. 

This brings to mind family time, Turkey and Pumpkin pie.

My project for this months http://paperfundaychallenges.blogspot.com/?m=1 is a Pumpkin inspired card.


I am very thankful for the team at Paperfundays Challenge who earlier this year gave me, my first ever Dt slot. It has been an amazing year creating beautiful projects for the blog and I can't wait to see what next year holds!

The Pumpkin image was kindly supplied by Artsy Stamper and you can find this and other gorgeous digital images here https://www.etsy.com/uk/listing/719061040/autumns-gifts-stamp-set-for-collage

No matter weather you celebrate Thanks giving or not, take a min to think about what you are thankful for, because even on a bad day we all have something that can make us smile 

Xoxo

Wednesday 6 October 2021

Simple frame card


This month the  http://paperfundaychallenges.blogspot.com/?m=1 was sponsored by Fred she said, you can find there store here, https://fred-she-said-store.blogspot.com/?m=1 

Our theme was use something purple and Halloween. For this card I used Tonic classic card stock for my base in Amethyst Purple, I then used a purple card stock from Craft Sensations  for my layer and main card front.

The papers I chose were Painterly Pastel papers, a direct link to them in the store is here, https://fred-she-said-store.blogspot.com/2017/05/painterly-pastel-papers.html?m=1

I cut out three large frame dies, one middle frame and several small frames from each paper and kept the inside of each frame for later.

I arranged the three large frames on my cardstock.

I wanted to use the innards of the frames so I went about cutting them to fit inside the various frames. I mixed and matched the colours filling the frames.


Next I started layering different parts of different frames on top of each other at different parts of the design and also double layering for an interesting effect.

Along the bottom I arranged three of the smallest frame interlinking but at an angle. The cardstock below I left its original colour.

I used a die from Spellbinders which cuts and embosses to die cut the banner. I found a piece of purple card in my scraps folder as well as some white and die cut the banner twice.

I fussy cut the center out and stamped a sentiment using my Wiggly words stamps from Creative. The ink I stamped with was Versafine Onyx Black.

I used Cosmic shimmer glue to attach the white layer into the purple banner and attached it to my design with foam pads. I positioned it across the three small frames.

The purple enamel dot is By Craft Consortium and the Gift of giving collection found here, https://www.craftconsortium.com/product-page/the-gift-of-giving-adhesive-pearls

I then mounted the card topper onto my base using foam pads.

To finish I used Nuvo Crystal Drops in the colours: Auburn Pearl, Apple Green and Bottle Green.

I love the effect this card has, it feels like you are looking through a spooky dimension at swirling gasses.

Thank you for joining me again this month, I really appreciate you taking the time to visit my blog.


Happy Crafting and for those that celebrate it, Happy Halloween 

Xoxo

Wednesday 1 September 2021

Autumnal Crafting


The nights will soon be drawing in, the air will have a fresh nip to it and that can only mean Autumn is on its way!

I love the Autumn  with its crunchy leaves and the warm tones it brings. Always a good excuse for a hot chocolate and crafty evening!

At http://paperfundaychallenges.blogspot.com/?m=1 this months twist is Autumn and I had just the collection to create some inspiration with.

This set from Kanban features everything you associate with Autumn including some delightful sentiments.

For the Deer card I used my Daisy Mae circular nesting dies to cut the base from Centura Pearl cardstock. I then simply layered the images using foam pads.


For the next card I decided to create a tryptic design. I have a video of the process (although not for this particular card) on my YouTube channel here

https://youtu.be/qaBnWv5CYJQ


My autumnal card is 8 × 8" in size. I chose the checked background card from the kit and cut it to fit the card blank.

To make the matt layer under the images and sentiment I simply drew round the design and fussy cut it.

I added gems, orange ribbon and leaves from my stash.

I think both cards turned out great and I am really pleased with them.

Thanks for stopping by.

Happy Crafting 

Xoxo

Wednesday 4 August 2021

PaperFundays Challenge


This month I was so lucky to be able to choose an image from https://www.polkadoodles.co.uk/ to work with for my Dt project for http://paperfundaychallenges.blogspot.com/?m=1

As soon as I saw this little guy I knew I wanted to make a tag and have him as the main feature!

I coloured the image using my pencil colours from the Black Widow ranges, I then fussy cut him and placed him on foam pads.

The tag is made from Tonic Studios cardstock and was cut out using a die by Daisy Mae designs, available from Craftstash or The Craft Store.

I then drew around the inside of the die with a pencil on the Dsp I wanted to use and carefully cut it out. 

I used wet glue to adhere the Dsp to my tag and then the foam pads to add my party gnome. 

I finished the design with ric rak ribbon, a sentiment from my stash and a few sequins for decoration. 


The twist element this month was cute critters, I instantly knew who's collection to use for this!!

I have used Bluebells and Buttercups which is a stunning collection from Helz Cuppleditch and Craft Consortium. It features these adorable Woodland animals and is one of my favourite collections of the year.

I used a 5 x 7" card blanc and adhered a piece of black cardstock slightly smaller than the card base on top.

I cut four different panels from the Dsp and layered these over the top making sure I had neat boarders and continuous lines.

The topper is matted onto black cardstock and placed in the middle.

I used cream cardstock to stamp my sentiment, and matted this on black cardstock again.

The sentiment is from another Craft Consortium stamp set from the range " The gift of giving"

You can find Craft Consortium and their products here https://www.craftconsortium.com/

I hope you like the cards I have created for this months challenge and look forward to seeing your entries.


Happy Crafting 

Xoxo

Thursday 29 July 2021

Create your own Planner Pt 2


Today I am creating the dividers and inserts for my Christmas Planner.

A tutorial on how to do this can be found here https://youtu.be/mM3Gh63za2Y

For the dividers you will need Dsp measuring 8 1/4 × 11 3/4" scoreline at 2 7/8"

For the inserts you need a piece of A4 paper cut to 8" in width an scored at 2 7/8"

I have used the It's Snome Time collection by Craft Consortium throughout this planner, and you can order it here  https://www.craftconsortium.com/

I hope you have enjoyed following the creation of this planner and give it a go yourself. 

Tomorrow is the last day of my xmas in July mini series and I have a lovely stamping technique for you!

Happy Crafting 

Xoxo

Wednesday 28 July 2021

Create you own Planner


Welcome to the second day of my xmas in July mini series.

Today I am sharing how I made this Christmas Planner.

A video tutorial is available here https://youtu.be/5-0l5L2lNx

I cut my cereal boxes to 9 7/8 × 8 1/2"

The spine in 1 inch.

I used 12 × 12 paper to decorate the outside covers, for the inside covers the cardstock was 8 3/4 × 8 3/4". The spine cover further inside was 1 × 9 7/8"

For the no sew binding you will need 2 x length of the spine for every signature, plus 2 lengths and a  bit for luck!

Eg 5 signatures would be 12 lengths and a bit for luck.

The no sew binding was a tutorial I found by Treasure Books.

Its Snome Time is available to order here https://www.craftconsortium.com/

Tomorrow I will be sharing a video on how to make the dividers and inserts for the planner as well as decorating it!

Happy Crafting 

Xoxo

Tuesday 27 July 2021

Floating display card


 Happy Christmas in July!!

I am kicking off my Christmas in July mini series with my Floating Display Card.

Several people have asked how I made it so I thought I would share a tutorial so you can create them too!

A video tutorial is available here 

https://youtu.be/cIA9QLgwnWY

The base is a piece of cardstock measuring 12 9" and scored at 2,4,8 & 10" on the Longside. 

Rotate and score at 1 1/2 and 7 1/2" on the short side. 

Using a trimmer or craft knife cut from the 2" scoreline to the 10" scoreline on the scorelines in the short side.


The measurements for the mirror card is as follows: 

Two pieces of 1 7/8 × 8 7/8"

Four pieces of 1 7/8 × 1 3/8"

Two pieces of 3 7/8 × 1 3/8"

Two pieces of 1 7/8 × 5 7/8"

One piece of 3 7/8 × 5 7/8"

You do not have to use Mirror board you could use plain cardstock or miss that part out completely it is entirely down to your preference. 

The DSP measurements are as follows:

Two pieces of 1 3/4 × 8 3/4"

Four pieces of 1 3/4 × 1 1/4"

Two pieces of 3 3/4 × 1 1/4"

Two pieces of 1 3/4 × 5 3/4"

One piece of 3 3/4 × 5 3/4"

I used Craft Consortium Nativity collection which is available to order from https://www.craftconsortium.com/shop


I hope will enjoy creating this as much as I have.

If you do re create this card please do tag me on social media so I can see your creations.
Happy Crafting 
Xoxox


Friday 16 July 2021

Christmas in July Winners


Wow!! 

What a fabulous Xmas in July hop!!

Thank you to PaperFundays Challenge blog and Inspiration Station for hosting!

I really enjoyed taking part and hope you did to!

If you haven’t had enough of Xmas in July yet keep an eye on my YouTube channel where I have a Xmas in July series about to begin!

If you participated in the hop you were eligible to win a prize!!

The winners have now been chosen at random...

Spellbinders Die - Denise Bryant 
Maymay Made it Stamp Set - Crafty Hair Lady 
Park Lane Dimensionals - Granmargaret 
Gina K. Tidy Towel - Bunny 
K & Co Chipboard Embellishments - Lisa J. 
Greeting Farm GC - Lisa Jannaway 

Congratulations to all the winners, please contact Donna to claim your prize!
Donna @ dlflowers64@gmail.com. 

Huge thanks to everyone who joined in. There is still time to enter our monthly Challenge over at http://paperfundaychallenges.blogspot.com/?m=1

This months theme is anything goes with a summer twist.

Happy Crafting 

Xoxo

Friday 9 July 2021

Christmas in July Hop

Hello Crafty Friends and Happy Saturday! Today, http://paperfundaychallenges.blogspot.com/?m=1 and  https://inspirationstationchallenge.blogspot.com/?m=1 are hosting a Christmas in July Blog Hop! 
Please Hop along with us today for some fantastic holiday crafting inspiration and there are Prizes too!
 If you were directed here from Donna's https://duncanstreetdesigns.blogspot.com/2021/07/its-chrismas-in-july-blog-hop.html?fbclid=IwAR1E43USYwHRyIboKVc6Vjj_IgVCH4CQNB3gV0jOvhOPC2u_QBBDolrqLGU, you’re in the right place. Should you get lost, please start at The Paper Funday Challenge Blog and work your way through the hop.


For my project today, I’ve created three different Christmas cards. 

For the first card I used a red 5 ×7 card blank, I matted some green cardstock, that had been cut 1/8" small than the card blank on top. Next I layered a piece of blue DSP which again had been cut 1/8" smaller than the green card stock. The topper was sent to me in Happymail but I believe it is by Hunkydory and I matted that onto a piece of green cardstock that was this time 1/8" larger than the topper! The greetings sentiment is by Doo Crafts.

The second card I again used a 5 × 7 card blank, this time in green and this time I used gold mirror board that was 1/8" smaller as my first layer. Next I used the really pretty piece of Dsp with the mistletoe, this isn't usually a colour I use on Xmas cards so I wanted to find a way to use it!! I have a stamp and die set by Crafti Potential which I used for the wording on the card. I added glossy accents to the merry and sequins to finish.

For my last card I stamped and heat embossed my sentiment before I embossed the piece of red card stock and then dragged a light green ink pad down the card to colour the raised embossed areas. I added Nuvo Crystal drops in the shade Red Berry and then added matts and layers and a little ribbon to finnish.

For this Hop, 6 prizes will be awarded to 6 randomly chosen commenters. To be eligible for a prize, you must answer this Question below:

 What is the magic number of subscribers I am trying to reach on my YouTube channel and by when? 
You can find the answer over on my YouTube channel with this video 
https://youtu.be/nHMW0tJRemA and I would love it if you would consider subscribing too!

Your next stop on the hop is Amanda https://amandacruxton2.blogspot.com/2021/07/christmas-in-july-blog-hop.html?m=1 Should you get lost along the way, please go back to beginning of the hop at The Paper Funday Challenge Blog / The Inspiration Station Challenge blog to find you way. Please hop along with us, have fun and Good Luck!

Wednesday 7 July 2021

Pony Love by Hetty Clare


Sometimes a chain of events are serendipitous and that is certainly what happened when I got to choose a Hetty Clare digi stamp for this months http://paperfundaychallenges.blogspot.com/?m=1 design team project!

As soon as I saw this image I knew it was the one I needed to create my card with this month. I am exceedingly lucky to have my own pony and things have been going so well with her lately that this picture could well be us!!!

For my card however I have based the pony on my friend and her horse, as she has a birthday coming up and I knew she would love a personalised card!!

I used the black widow range of pencils to colour the image:

B/w - Black Widow 

Co - Cobra

SK - Skin

MN - Monarch 

SC - Scorpion

-------------------------------

MN - Rusty

B/w - Foxy Brown

Co - Rattlesnake 

Co - Flate Black

Sk - Snow

Co - Charcoal

Sk - Midnight 

Sk - Grey thorn

Mn - Blue moon

Sc - Galaxy blue

B/w - Starry night

Mn - Fawn

Mn - Ice cream 

Mn - Opal

Sc - Turquoise 

Sc - Blood red

I also used some Tim holtz distress inks in the colours Tumbled glass, mowed lawn and rustic wilderness.

To finish I used a topper from my stash.

You can find this image and many more by Hetty Clare at

 https://www.etsy.com/uk/shop/HettyClare

I hope you like the card I created and will check out our sponsor and challenge blog!

Xoxo

Wednesday 2 June 2021

Sparkle and shine/Paperfundays Challenge


This months twist at Paper Fundays Challenge was Sparkle and shine, which to me absolutely screams Christmas!

To join in with the fun use this link


To start with I have created a fun fold card, a tutorial for this will be on my YouTube channel very soon!
I have used Christmas tales by Craftlabel as my DSP and I used mirror card from hobby craft as a matt layer from some shine.


For added Sparkle I have used the glittered reindeer, and the presents and stocking along the bottom contain holographic card. The sentiment finishes off the shine with its foiled detail.

Next up I decided to create some items for a xmas in July swap ( yes I am that organised lol)

I embossed some gold and silver card stock, die cut some poinsettias and pieced them together from mirror card as well as using holographic cardstock to cut some snowflakes. I also made some festive bows from glittered card stock.


Lastly I made a tag by embossing some cardstock I had painted with Sparkle Inks, I then used Nuvo Embellishment mousse on the debossed side to highlight some of the Holly leaves, the snowman was painted in Sparkle Inks and had fake snow glued to him before being adhered to the bottom. I finished off with red trim and some stencilled snowflakes, again opting for embellishment mousse.

This was a super fun twist challenge and I  can't wait to see what is in store for you all next month

Xoxo

Tuesday 25 May 2021

Storage folio


I was recently clearing out a load of old magazines and I came across a guide for how to create a card storage folio.

The original guide can be found in Papercraft Essentials issue 181.

I have tweaked it slightly but all the measurements are below.

A video of how to create this can be found on my YouTube channel by following this link.


https://youtu.be/0Dn9kp9nsNk


Card stock needed:

Two pieces 19.5 × 22.5cm

Two pieces 25 × 20cm

One piece 25 × 10cm

One piece 25 × 12cm

One piece 2 × 25cm

Two pieces of 12 x 12" DSP

5 pieces of DSP 19.5 × 25cm

1 DSP 5.5 × 25cm

1 DSP 4 × 25cm

1 DSP 2.5 × 25cm


I hope you find this useful, if you create this or any of my other tutorials please tag me on social media so I can see what you have created.

Xoxo


Tuesday 4 May 2021

Dome display card


The great thing about being on a design team, is that it give you a brilliant excuse to try out card styles you have been meaning to do for a while and not got round to!

This month for the Paper Fundays Challenge (link below) we were kindly provided with images by Artsy Stamper (also linked below)

I decided to make a dome display card to showcase the image and followed a tutorial by Sam Calcott of mixed up crafts to do so.

The supplies I used were:

Tonic studios cardstock.

Daisy Mae designs torn edge nesting ovals

Wonderful Sweetness from The Works

Glossy Accents 

Acetate and plain cardstock from Hobbycraft 

An embossing folder from Papercraft Society box no 18 by Card Making Magic

Image and sentiment from Artsy Stamper

I am really pleased with how this card came out, I hope you will check out the Artsy Stamper who has many beautiful designs and why not come and join in at Paper Fundays Challenge.

Xox

https://www.etsy.com/uk/shop/TheArtsystamperShop

http://paperfundaychallenges.blogspot.com/?m=1

https://youtu.be/wk5PtzmPaF4

Tuesday 6 April 2021


 This is my Dt Project for this months challenge from Paper Fundays Challenge blog http://paperfundaychallenges.blogspot.com/?m=1

This month I have used an image from Paper Nest dolls

 https://paper-nest-dolls.myshopify.com/

I coloured the image using my Black Widow pencil collection and added some Easter egg ribbon to the corners before making a securing a bow.

To finish I layered the image onto some purple mirror board from my stash.

Hope everyone had a great Easter 🐣 

Thursday 25 March 2021

Peek-a-boo card


Today I am sharing this Peek-a-boo card inspired by Jennifer Maguire/Sam Calcott.

For the card base I have used 3 pieces of Tonic cardstock cut to:

5 × 10 5/8" scored at 7"

5 × 11" scored at 5 1/2"

5 × 7 1/4" scored at 1/4"

I used The Gift Of Giving collection by Helz Cuppleditch and Craft Consortium for my Dsp, they were cut to:

4 3/4 × 6 3/4" for the front

4 3/4 × 5 1/4" for inside 

6 1/2 × 4 1/2" (White card for sentiment)


A video tutorial can be found by following this link https://youtu.be/qGGYTdqIr-0

Tuesday 2 March 2021


 This months challenge was sponsored by 


https://www.etsy.com/uk/shop/VectoriaDesigns

https://www.stamponit.net/qkr-stampede/mfp/path,digi-images

With a twist option of Irish luck (use something green)

I was lucky enough to get to use the stunning Peter Rabbit pack from Vectoria Designs and I made this Peter Rabbit box card.

I used Distress inks to make the reciept pads look dirty from the garden and then I fussy cut the other elements and attached them to struts in the box. I added a few elements from my stash and made the birthday sign using brown card stock and a wood grain stamp.

For the twist card I made the clean and simple card

If you would like to see how this was created please follow this link to my YouTube channel.


To take part in this months challenge check out:

http://paperfundaychallenges.blogspot.com/?m=1

Thursday 18 February 2021

Off the page shaker card


Today I am sharing a tutorial on how I created an offthr page shaker card.

This is a really simple and effective technique.

You can find a tutorial for this technique by using this link

https://youtu.be/w8MVUFewj2M

For this card you will need:

One 6 × 6" card blanc

One piece of foiled card 5.5 × 5.5"

One piece of white card 5 × 5"

1 piece of acetate 2 × 6"

A stamp set of your choice 

Sequins or similar 


If you create this card and share it on social media please tag me so I am able to see what you have made.

Tuesday 2 February 2021

My First Ever DT Assignment!


I am so excited to share the exciting news that I am now part of the design team for The Paper Fundays Challenge blog!!! You can join in the fun and potentially win a prize by using this link; 

http://paperfundaychallenges.blogspot.com/?m=1

For my first assignment I chose Coffee Bean Bestie (as pictured above) by Sherri Baldy Besties. I coloured the image using Black Widow pencils and then cut it out using an oval cutting die. I used Dried Marigold distress ink around the edges. I then created an oval easel card base and attached the image to it, using some coffee cups from my stash as the stoppers.

Links to this months challenge sponsors can be found below:

https://www.mybestiesshop.com/store/c169/SHOP_ALL_Digi_Stamps_LISTED_By_EACH_Collection%21.html


https://www.etsy.com/shop/HettyClare

I also created two cards for the love is in the air twist challenge.


A video of these cards can be found by following this link 

https://youtu.be/cWvV0dHqcRY

Monday 25 January 2021

Tripple Time Stenciling


Hello everyone, this year I think there are going to be a few trends in crafting.
I think the trends we see will be:
Flat cards 
Using your current stash
Supporting small businesses when we do need supplies.

With that in mind I decided I wanted to find another use for my stencils, I thought I would see if it was possible to adapt a stamping technique for a stencil.

You can find a video tutorial for the process I used by using the link below:


For this card the cards sizes I used were:

Blue

5 7/8" sq
4 1/8" sq
3 1/2" sq

White

5 1/4" sq
4" sq
2" 7/8 sq

I hope you find this useful and will give it ago. I would love to see what you come up with so please tag me in your creations if you share them anywhere 

Xoxo